About purchases
Learn about how purchases work
Purchases are the records of buying your materials. Every time you add a purchase, the app automatically increases your material stock levels and recalculates your unit costs to reflect the new stock. You can also record non-material business costs (like rent, utilities, and fees) as overhead purchases to keep your full financial picture in one place.

We'll cover:
- Material purchases
- Non-material (overhead) purchases
- Categorising purchases
- Configuring a purchase status
- Configuring a delivery status
- Expected delivery dates (ETAs)
- Purchase FAQs
Material purchases
Any purchases relating to material stock should always be entered as a material purchase to ensure they are added to your inventory and included in your Cost of Goods Sold (COGS).
When you add a purchase to account for an increase in your materials, the app will automatically increase the stock levels of the material purchased by the amount in the purchase. It will then recalculate your real-time unit costs to factor in the newly purchased stock.
Purchases can be:
- Added manually, or
- Pulled via an integration, or
- Imported in bulk via CSV
Purchases are not designed to handle the usage of materials when creating your finished items. You'll want to create a manufacture containing your used materials to do this. This will automatically calculate your material costs and adjust your material inventory by the exact amount used to create the item.
Adding material purchases manually
To add a material purchase:
- Click Purchases in the main menu.
- Click Add Purchase in the top-right corner of the page.
- Click the Add Purchase Item button.
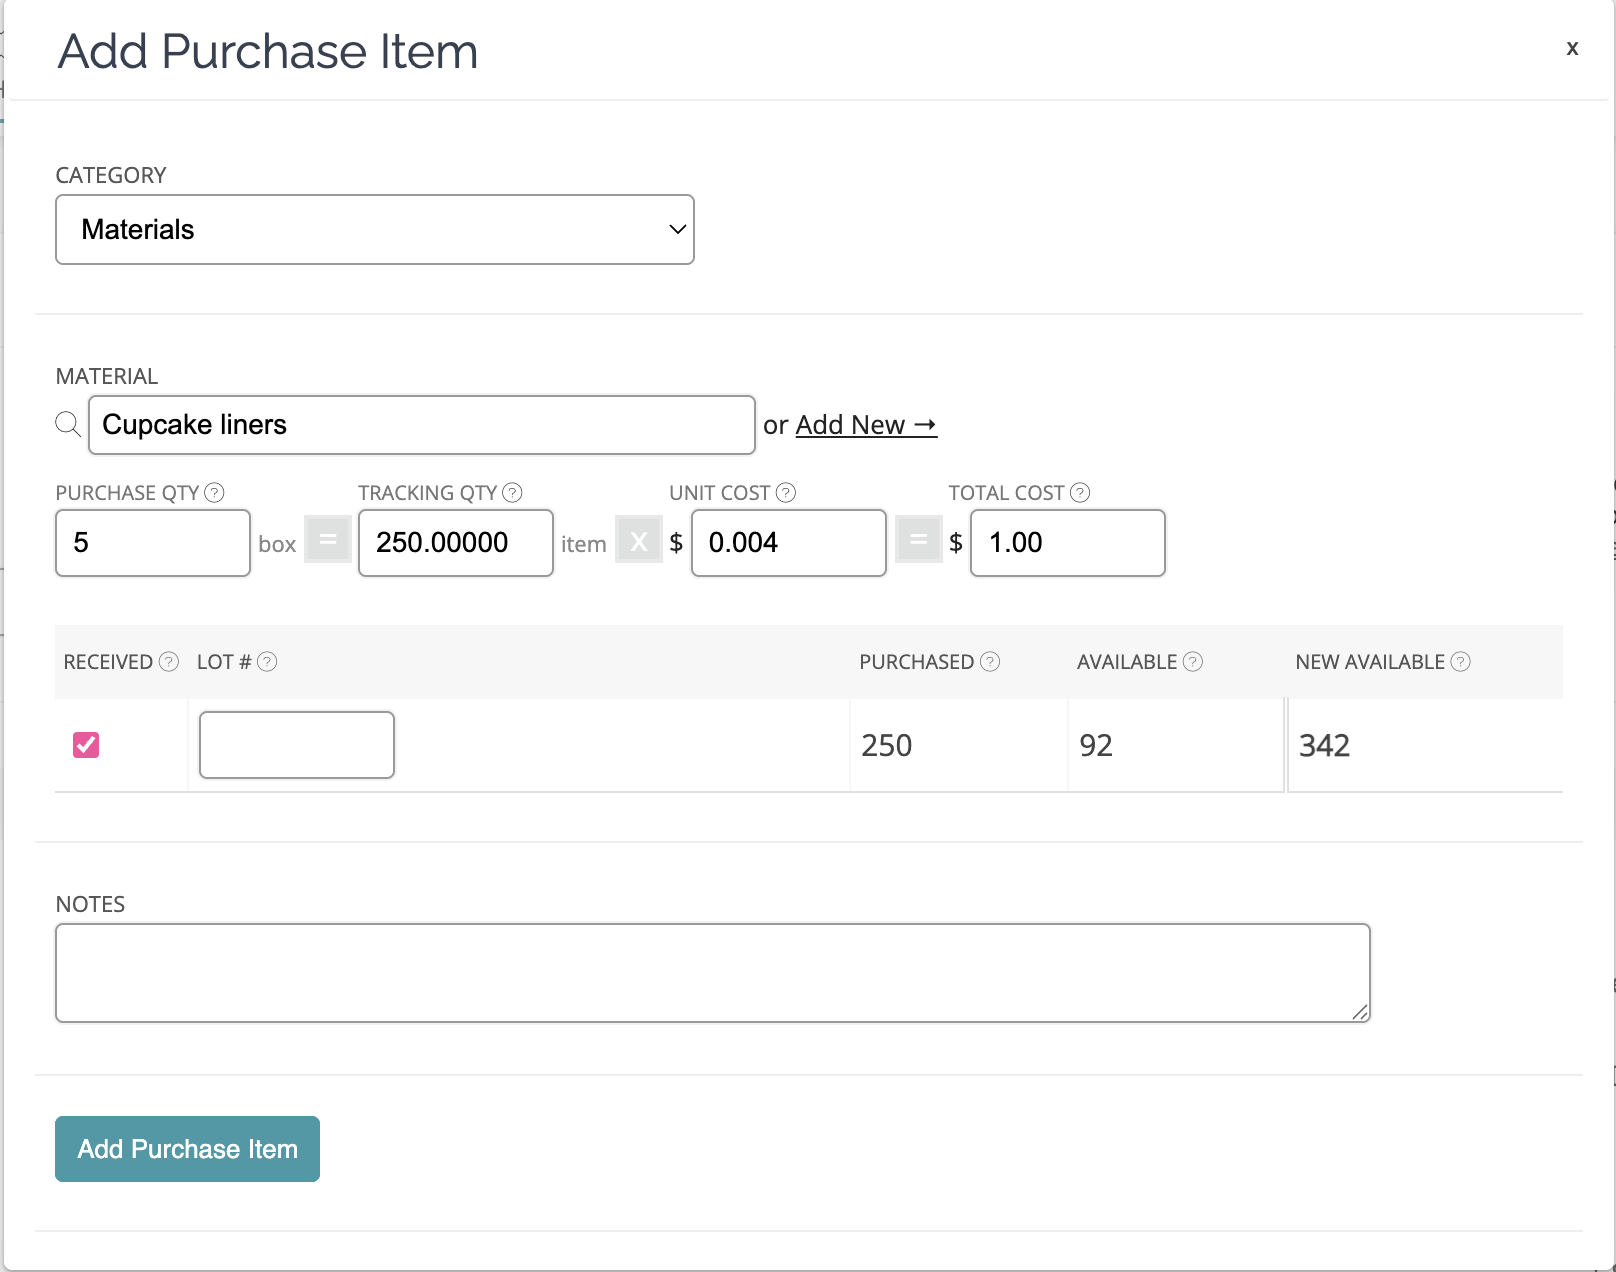
- In the Add Purchase Line Item window that appears, select the Material category.
- Select or create a material in the search box that appears.
-
Enter the cost and quantity of your material purchase, then click Add.
- Click Save.

Non-material (overhead) purchases
Purchases for your business that are not directly related to a product or order (e.g., rent, utilities, fees, and subscriptions) can also be tracked in the app if desired.
These are referred to as "overhead" purchases (also commonly called indirect or general expenses).
Adding non-material purchases manually
To add an overhead purchase:
- Click Purchases in the main menu.
- Click Add Purchase in the top-right corner of the page.
- Click the Add Purchase Item button.
- In the Add Purchase Line Item window that appears, select a non-material purchase category (e.g., Other).
- Enter the cost and quantity of your overhead purchase, then click Add.
- Click Save.
Categorising purchases
Each purchase you add to your account can be classified into a specific category. This lets you group your costs to make tallying and reporting simple.
It also lets the app know when a purchase should be added to your inventory and COGS totals.
Configuring expected delivery dates (ETAs)
Track your incoming material shipments by listing the dates they are expected to arrive. ETAs can be switched on via your admin settings and set for individual purchases.
More details on purchase ETAs →
Purchase FAQs
Below are some common questions we've received about purchases.
How should I handle free or found materials?
Items you have found or received for free should generally be entered into your account as a $0 purchase, since you have not paid anything for these items. We advise confirming with your accountant or financial advisor, as all business situations differ.
What should I do when I return a purchase?
To record a return for materials on an existing purchase:
- Edit the original purchase entry and remove the line item(s) that were returned.
- Add any replacement or new purchase items, if applicable.
If there are additional shipping costs related to the return, these can be added to the Shipping field on the purchase order. This allows the cost to be proportioned across the remaining items and included correctly in your COGS.
How can I set up a recurring purchase?
We don't currently provide the ability to schedule recurring expenses. However, you may wish to use our Copy Purchase feature to clone existing purchases quickly.
How do I factor in tariffs I have paid on purchases?
Tariffs should be included in your costs of purchase, as they are a necessary expense to bring your material to you. While we don't yet have a dedicated field for tariffs, entering any tariff amounts paid in your Shipping field will ensure that it is factored into your unit costs and, thus, COGS. See our blog post for further details: How tariffs affect Etsy sellers & what you can do →
Can I add custom fields to purchase orders and include that info on product labels?
At the moment, the app doesn't support custom fields for purchase orders or automatically adding that information to product labels. However, you can use the Notes field in the purchase order to manually record any extra details you'd like to track.
Can I print a purchase order?
At the moment, the app doesn't include a built-in print option for purchase orders. You can, however, print one through your browser by opening the purchase order and using Ctrl+P on Windows or Cmd+P on Mac.
Want to make sure you're capturing the true cost of your materials, including freight and import duties? The Landed Cost Calculator helps you work out the real per-unit cost before entering purchases in the app.
Need Help?
Still have questions about purchases? Please get in touch, and we'll be happy to help.