Add, change or remove a material stocktake
Learn how to add, make changes to, or remove a material stocktake.
Not sure whether your stock levels in the app match what's actually on your shelves? A stocktake lets you count your physical materials and flag any discrepancies so your inventory stays accurate.
This article covers how to create a material stocktake, what you can change after it's been generated, and how to remove one if needed.
In this article:
Stocktaking should not be used to add or remove stock to the system. This feature is intended as a way to cross-check your physical inventory with your inventory in the app.
Creating a stocktake
To add a stocktake:
- Go to your Overview page.
-
Hover your mouse over the "More..." menu below the reports section, then select Stocktakes from the options.

- Click the Add Stocktake button on the list page that appears.
-
On the New Stocktake page:
a. Select Material as the Stocktake Type.
Note: components are considered materials for stocktake purposes and are included in results.
b. Choose how you want the system to generate your stocktake list by selecting All or Random.
c. Select the Total Count Size if you would like to limit your stocktake count to a specific amount (for example, if you'd prefer to stocktake only the first 100 items found).

If you choose Random, you can select which categories the system pulls from — useful for periodic cycle counts. All is better for a more comprehensive count.

-
After clicking Generate Items to Stocktake, you'll be taken to the stocktake page. For each material in the list, enter your actual physical count in the Actual Qty field, then click the teal confirm button (a solid button with a white checkmark icon) to save the count for that row.
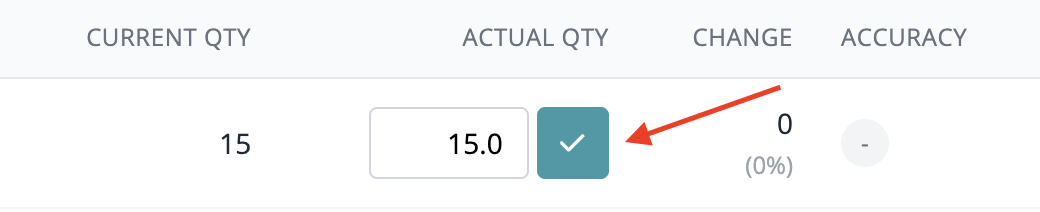


Once you confirm a row, the input field is replaced by the confirmed count shown as plain text, and the row's completion indicator updates to show a green checkmark. Rows that haven't been confirmed yet show a grey circle with an X.
You'll also see an accuracy score in each row based on how much the actual count differs from the system count:
| Perfect | Physical count exactly matches the system count (0% deviation) |
| Very good | Deviation within ±2% |
| Good | Deviation within ±5% |
| Okay | Deviation within ±10% |
| Review | Deviation greater than ±10% — worth investigating |

Head here to learn more about the app's stocktake accuracy ratings: Stocktake Accuracy Ratings.
Changing a stocktake
Only notes and code fields can be edited for a stocktake once it has been generated. If the physical counts you entered are incorrect, you'll need to remove the stocktake and create a new one. This ensures that all adjustments entered as part of the stocktake are reverted and your stock levels are returned to the correct pre-stocktake levels.
Removing a stocktake
To delete a stocktake:
- Go to your Stocktakes page.
- Hover your mouse over the ⋮ far right of the stocktake code next to the Complete column
-
Select Cancel from the options that appear.


Cancelling a stocktake will remove any inventory adjustments made for the materials involved.
Need Help?
Still have questions about stocktakes? Please get in touch, and we'll be happy to help!